Saturday, February 21, 2015

Art Sign Tutorial with Collage Elements

Well, Hello There!

It has been a little while since I last posted. Our house was under the attack of a terrible cold that lasts 2 weeks per person. Of course everyone gets it at different times! I am feeling much better now, though.


I really wanted to post a video art tutorial, but am still working out how to do those. HOWEVER, I do have a photo tutorial for you today! This was a commissioned piece with requested quote and colors, so I decided to take photos of each step. Keep in mind I worked on this over the course of 5 days, allowing drying time between the steps/layers. 


I used a reclaimed white oak wood kneeling bench about 33 x 5 inches. After dismantling, it was ready for my artful purpose! You will see two boards in some photos, the other is for a wedding gift that I will finish later.


1.  Sand smooth - I used a sander. Fill in holes with wood putty. Let dry over night. Sand again.

2.  Prime with white gesso. Let dry. Sand in some areas to distress.


3.  Apply petroleum jelly in spots where you want the white to show.

4.  Paint with color. I mixed up this nice green using acrylic paints. Let dry.

------------------------

5.  See in the corner how the petroleum jelly repels the paint? Wipe off the paint resisted by the jelly. I used paper towels.

6.  Then I used baby wipes to get all the jelly off the surface, or you could use a slightly soapy rag. Let dry. Again apply petroleum jelly to the white and green spots that you want to show.
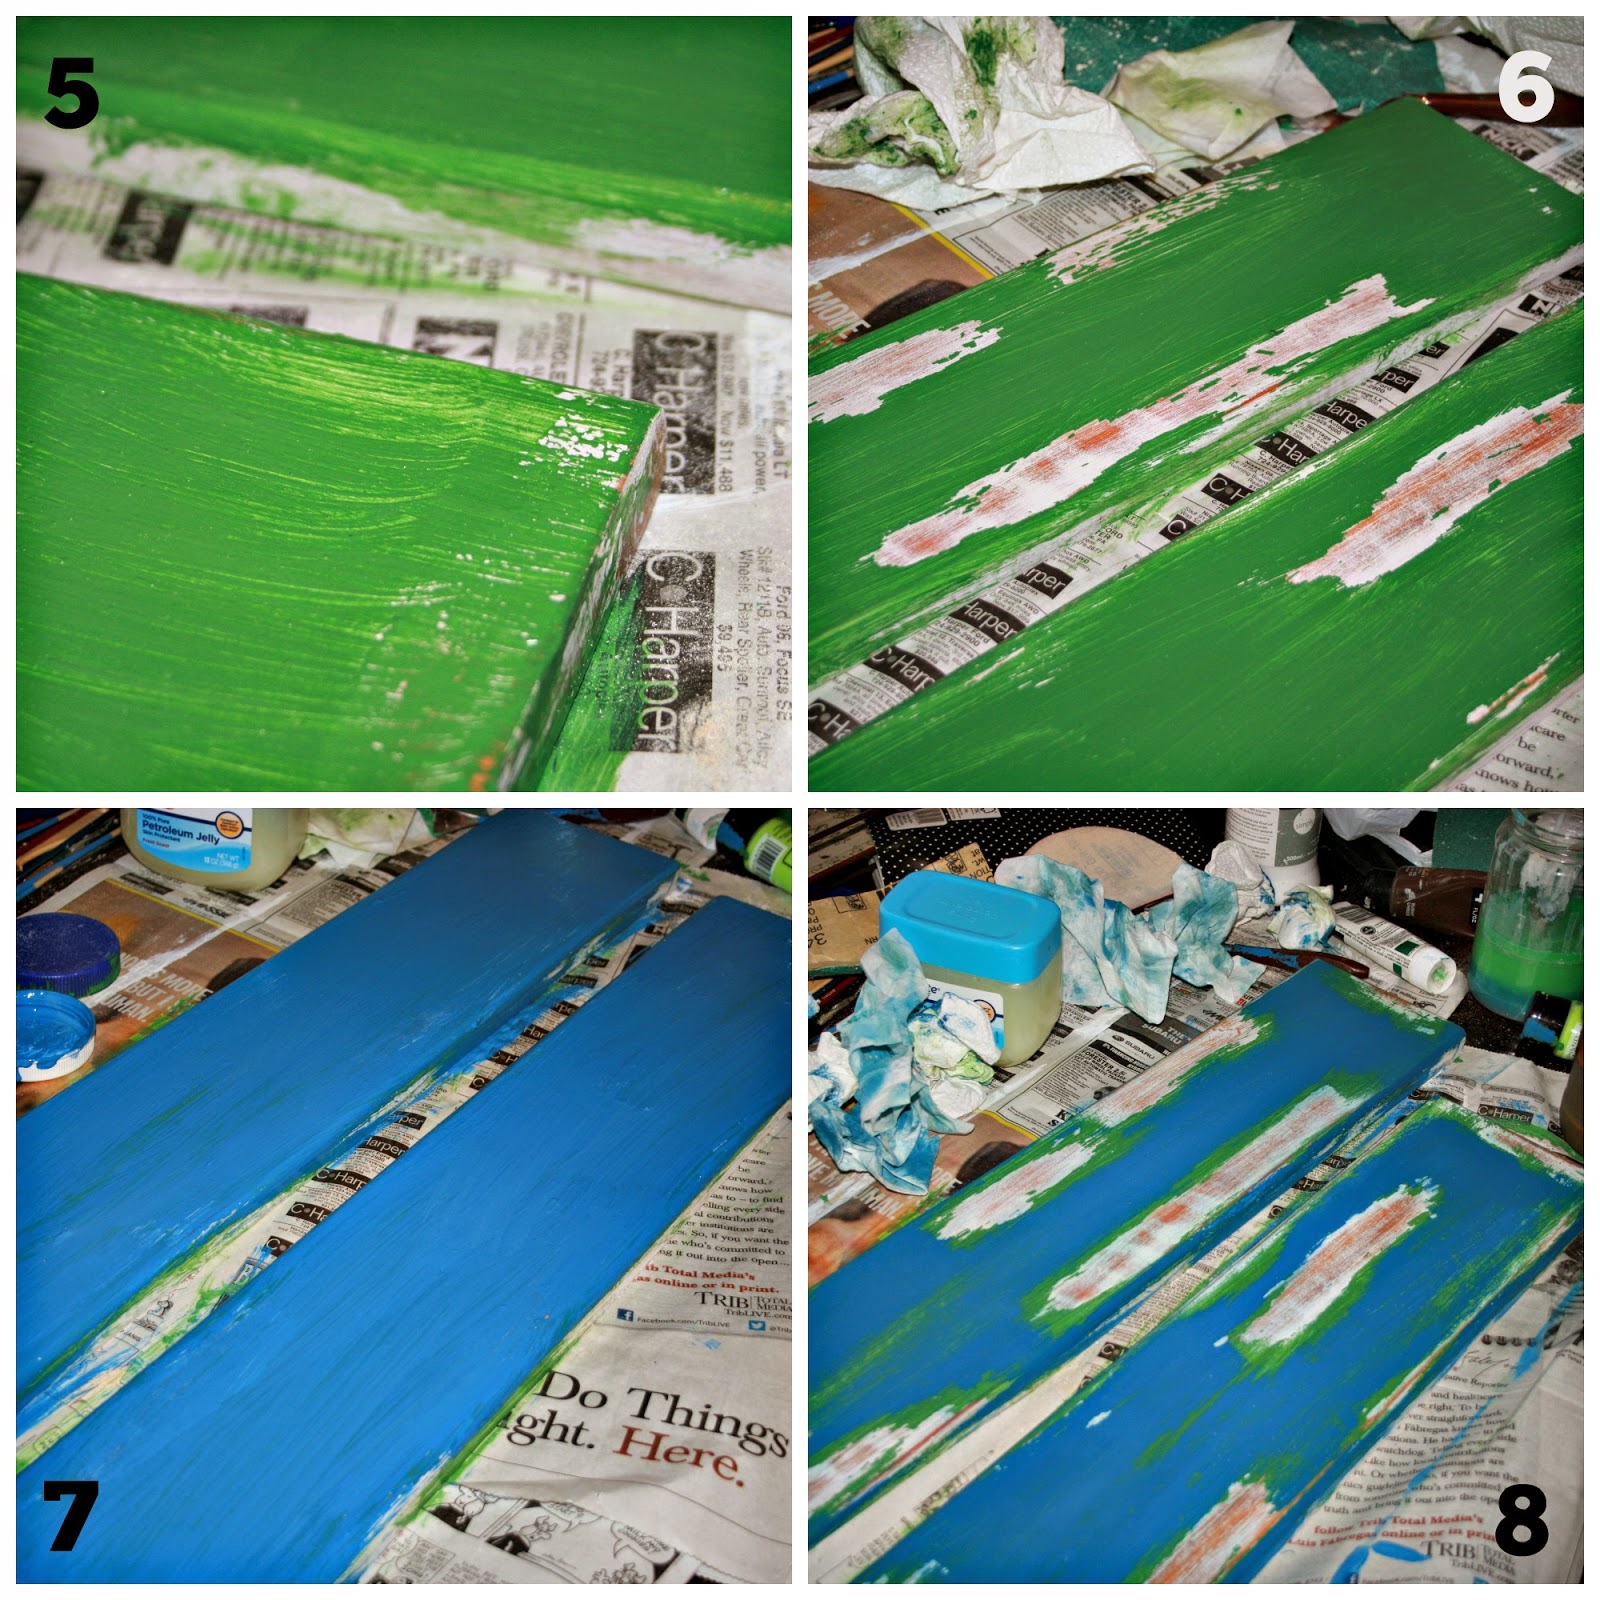

7.  Paint a second color and let dry.

8.  Again wipe off jelly w/ paper towels and clean it all off with baby wipes. I gave it a bit of a light sand at this point to get off any loose bits.


------------------------

9.  I took a lighter blue and used a palette knife to scrape the color where I wanted it.

10. I love to reuse/recycle stuff in my artwork, so here is the plastic bottom of a store bought cake that I saved because of the lovely honeycomb pattern. I painted and stamped, then filled in a bit with a small brush.


11. I chose a font, printed it out, and taped it together. I used graphite paper underneath and traced over the letters with a pen. (I have practiced calligraphy since I was 12 and taken classes throughout the years both in a classroom and online. Given that little waiver, I use the methods that help me to save time and to get the font spaced and lined up correctly.)

12. I painted the letters black (a couple coats) and let dry completely. Then I shadow the letters under and on the right to make them pop. Let dry. 

------------------------

13. Now comes the collage part! I printed out some vintage bees on card stock. I cut them out  - just the head, body, and wings. I used a pencil to sketchy outline the honeycombs.

14. I used some matte medium and glued some transparent glitter onto their wings. Let dry completely.


15. Using the matte medium again I glued the bees down. Let dry. I then used the paper scrap as a guide to paint in the bee legs and antenna.

16. I used some gesso to lighten up the wings and highlight some around the bee. Then I used a blue ball point pen and traced around each bee to make them stand out more.

------------------------

17. Almost done! Here I brushed a coat of matte medium over the whole thing to seal it. Be careful where there is pen ink, cause it can smudge. Let dry overnight.

18. Finally, I spray the piece with Krylon UV coating to keep the colors vibrant!


19. A photo I took outside in the snow.

20. The full shot photo.

Oh yeah! I hammered saw-tooth wall hangers on the back. I signed and dated on the back too. 

Check out our Etsy shop for mixed media art pieces for your home! Commissions welcome!

I hope you enjoyed this tutorial!

Shawna

Saturday, February 7, 2015

3 Giveaways in 3 Weeks! No. 3

Congrats to Lydine, the winner of this giveaway!

This is it - the third giveaway in 3 Giveaways in 3 Weeks!


The winner of giveaway #2 was Marylinn - Congratulations!


Giveaway #3:
DIY Mixed Media Canvas Supplies (or use in your art journal!):
  • Dylusions Number Jumble 9x12 stencil
  • 20 Manila Tags 2 3/8 x 4 3/4 inch 
  • Grumbacher Academy Acrylics Mixing set 5 tubes
  • Grumbacher Artists Canvas 8x10
  • 8 piece Brush Set
  • Sharpie Purple Paint Pen

Approx. $50 retail value


HERE ARE THE RULES:
To be entered in this week's giveaway (#3) 

* Follow Me by Email at TOP RIGHT  (your email address will not be shared)
* Like Me on Facebook & share this post
* Follow me on Pinterest & pin this post.
* Follow me on Instagram & repost/tag friend @shawnagoforth #afgiveaway3 
* Follow me on Twitter & tweet this givaway
You MUST Email Me at artfulflourish (@) gmail (dot) com with your follow, share, pin, IG, and tweet Links/info to earn the entries. 
Giveaway #3 ends Friday, Feb. 13, 2015. Winner will be notified by email and must respond within 2 days or another winner will be selected. Package will be sent USPS.
Winner will be announced next Saturday, Feb. 14, 2015!

!!! I will be posting video art tutorials in near future !!!


Sunday, February 1, 2015

Bible Journaling

I have recently joined a Bible Journaling group on Facebook, and I really enjoy seeing all the beautiful artistic Bible pages. I do not have a journaling Bible yet, but here is an example of some my notes I took during church.


Thanks for visiting!

Saturday, January 31, 2015

3 Giveaways in 3 Weeks! Number 2

We have come to the second week with Giveaway # 2!
But first, the winner of the first giveaway was:
April - congratulations! I hope you enjoy your prize!
Here is the Second Giveaway!


Giveaway #2: this Set was also specially selected from my personal stash. Here is what's in this second set of yummy art journal supplies:
  • 3 pack of Baker's Twine - Red, Baby Blue, & Medium Blue
  • 20 Tags 2 3/8 x 4 3/4 inch 
  • 2 3-packs of Fireworks Shimmery Spray Inks - Campfire and Ocean
  • Strathmore Visual Journal - Watercolor, 140lb 
  • Yellow dual tip Painter's Pen 
  • Dylusions Letter Jumble 5x7 inch Stencil
Retail Value approx: $58.26

HERE ARE THE RULES:
To be entered in this week's giveaway (#2) Follow Me by Email at TOP RIGHT
(your email address will not be shared)
~~~ For additional chances (only after you've followed by email) you can… ~~~
* Like Me on Facebook AND share this post
* Follow me on Pinterest AND pin this post.
* Follow me on Instagram AND tell about the giveaway with #artfulflourishgiveaway2
You MUST Email Me at artfulflourish (@) gmail (dot) com with your share, pin, and/or tell Links/info to earn the additional entries. You MUST use the same email address that you "Followed Me by Email" with or the additional entries will not be able to be counted.
Up to 4 entries per person per giveaway. EDIT: up to 5 entries if you TWEET this giveaway, also!
Giveaway #2 ends Friday, Feb. 6, 2015. Winner will be notified by email. Package will be sent USPS.
Winner will be announced next Saturday, Feb. 7, 2015 along with info on GIVEAWAY #3!

Friday, January 30, 2015

Winter Blast and A Little Scribble

So I had it all planned. I was going to have a lovely post of my art class making Valentine's Day cards. But, alas, due to the snowy weather it was cancelled.

I did, however, get a couple snow pictures, and boy! - trudging in the snow is hard work! I find it completely beautiful here when it snows heavily. It is at least a foot deep out there, which is a drastic change to growing up in the Georgia winters of we're lucky if we get 2 inches for 2 days!


This is our pretty German Shepherd pup, Ziva. She accompanied me on my trek.


Buffalo Creek is right across the drive way, and it is beautiful in every season (except the rainy ones).


So now we get to a little scribble I did. It is not much as far as my handiwork, but this is what I thought when I was thinking about Valentine's day cards. This isn't a card, though; it was just practice. It is free to copy, if you like that messy, sketchy look.


Saturday, January 24, 2015

3 Giveways in 3 Weeks! #1

YAY! Here is my first Artful Flourish Giveaway! 
And I do love a good giveaway. This is the first of 
Three Giveaways in Three Weeks! 


Giveaway #1 Set was specially selected from my personal stash. Here is what's in this first set of yummy art journal supplies:

  • 4 Tim Holtz Distress Ink Pads - Vintage Photo, Victorian Velvet, Spun Sugar, & Broken China
  • 50 count Kraft Paper Label Stickers
  • Tim Holtz Stamp Pack - Urban Grunge, set of 8 cling stamps
  • Strathmore Visual Journal - Drawing, medium tooth, 100lb 
  • Red Sharpie Paint Pen - water based, medium point
Retail Value: $52.53

For this week's giveaway (#1) all you have to do to enter is leave a short comment on THIS post telling me what are your favorite art/craft supplies. 
~~~ For additional chances at giveaway #1 you can… ~~~
* Like Me on Facebook & share this post
* Follow me on Pinterest & pin this post.
* Follow me on Instagram & tell about the giveaway with #artfulflourishgiveaway1
Giveaway #1 ends Wed., Jan. 28, 2015. Winner will be notified by email no later than Fri., Jan. 30, 2015.  Package will be sent USPS.
Winner will be announced next Saturday, Jan. 31, 2015 along with info on GIVEAWAY #2!

Friday, January 23, 2015

Scrapbook Layout - yum

I loved doing this scrapbook layout with some Pink Paislee paper and embellishments!

Tuesday, January 20, 2015

Say Roar!

Here is a quick mixed media scrapbook layout that I did today of Will playing dress-up! 

Bubbles, Bubbles, Bubbles!

In art class, I taught the kids this fun technique to get these awesome bubble prints!


How To Do It:

1. In a bowl, mix paint, water, and a squirt of dish soap.
2. Blow with straw to get lots of bubbles to rise above the bowl.
3. Place paper on top of the bowl and lift straight up.
4. Repeat with different colors.

Beautiful bubble prints!


I Have An Art Studio!

All I wanted was a table upstairs in the attic to store my art supplies! However, my sweet son gave me his corner....AND it was his idea! I asked if he was sure and then jumped at the offer! Now I have my own little corner art studio, and I am loving it!!!


Thursday, January 8, 2015

Dream Big And Overcome

I did this for a friend over 3 years ago when I was just learning about mixing different medias. I used ink and Sharpies. I thought about it today when I was feeling like "I just can't get there from here."  I am taking Creative Jumpstart 2015, and today's video was by Jen Cushman who said (and painted) "Dream Big." So, I resolve to dream big and overcome! Thanks Jen! 


Thursday, January 1, 2015

Pop Art Inspiration

We recently had a pop art inspired art class where the kids colored with marker, photos that I altered. My daughter, Maddie, created this piece of our sweet German Shepherd, Ziva. I think she did a great job!


This is one of my students with her self portrait art piece all ready as a Christmas gift for her family! Super job, Grace!


Ho to do this project:
  1. Take a photo of your subject.
  2. Alter your photo with a photo editor. I used Pic Monkey. Size it to 6 x 6 inch
  3. Print out 4 of each image. I have an inkjet printer so I sprayed each one with Krylon Workable Fixative so the ink would not smudge.
  4. Cut out images
  5. Have kids color the images with bright colored markers.
  6. Glue down to 12 x 12 inch square canvas. Optional: Before gluing, paint canvas edges with black acrylic paint or black gesso and let dry. Try not to get glue on the front of the pictures so the marker will not smear. We used  Mod Podge or Acrylic Medium.
  7. Spray your art piece with a sealer like Krylon UV Resistant Clear Acrylic Coating.

Monday, December 8, 2014

Hand Dyed and Stamped Decorative Clothespins by Maddie and Lydia

The girls are so excited about their clothespins. They were tedious to make but with help from their big brother (who put all the pins back together after they were dyed) they got them finished! GoforthArtStudios


Our Etsy Shop!!!

We now have an Etsy Shop to sell some of our art pieces and craft creations! It is for the whole family. Right now I have mixed media art blocks for sale, but soon, my girls will have hand dyed and stamped decorative clothespins on the site. GoforthArtStudios


Friday, February 21, 2014

I have a dear friend, Stephanie, who has helped me in my house so much. We were making headway in organizing stuff before our whole house flooded the end of August 2013. She came back at least once a week after the flood (usually with her 5 kiddos in tow - and groceries) to help clean out and put our house back together. She organized donations for our family for months via FB. We are now back in the house and I wanted to say, "Thank you."


Monday, February 17, 2014

Well, there was ALOT of ink/paint spray left on the wax paper under the tags. Do we waste it? Oh, no! I grabbed a few sheets of watercolor paper and blotted it up, sort of like monoprinting. Here are the results:

Oh, the possibilities!

I was really excited after watching 's 15 minutes of mixed media. It her video she used waterbrushes with added color and I loved her results. So I went out to my local art and crafts store with my coupon in hand to get a supply of waterbrushes, and I ended up with this set of goodness!


These are watercolor brushes made by Speedball, and they are lovely to work with.

I used one of the sheets I had soaked up the paint and ink with, and filled in most of the white space with the watercolor brushes. 

The following is a project I completed for a friend using one of my no paint left behind sheets.


I think it turned out nice!


Saturday, February 15, 2014

Art Tag Bookmarks!

Art tag bookmarks for Valentine's day! Here are some picts of the process:

Drying w/ my vintage heat tool :)

On each color tag, I used 3 colors of Tulip fabric sprays first (opaque). Then we sprayed with 3 colors of Dylusions. We finished up with 3 colors of Fireworks sprays.

My 7yo daughter was helping spray the tags.

After the background was dry I stamped some cool motifs with Tim Holtz French Market and Imagestamps Border Lines. I couldn't find my permanent stamp pad (probably lost in the flood we had) so I pounced some Higgins Eternal black ink.

These are the finished bookmarks. I printed verses on tracing paper, tore, and glued w/ a glue stick. 
I sprayed a top coat of UV acrylic gloss and finished off w/ a yarn tassel look.


Saturday, May 5, 2012


This is a piece I made for my pastor's wife's baby shower. It is mixed media including marker, acrylics, ink, pencil, and vintage ephemera with matte medium and workable fixative. It was so much fun to make.


Thursday, April 5, 2012

HELLO!

Hello there! Well, this is my art blog where I talk about the artful things I am endeavoring. I will talk about the tools, media, and materials I use. I will post my projects, good and bad?...well at least the good! Thanks for joining me!